Fectio
Index


|
|

click here
|
How to ...
Make
a Late Roman ShieldBy Robert Vermaat
|
This
page is about making a basic item, the shield or scutum.
Well, a flat shield, that is. I am at the moment
attempting to construct an oval convex/dished shield make
of planks, but I will tell you how that went at a later
date, I hope.
| Tools
Ball peen hammer
Drill with spare bits
Hacksaw
Metal shears
Needle (+ spare)
Paintbrushes
Pencil
Saw (jigsaw)
Scissors
Tape measure
Vice
|
Materials
Coach bolts (not the
crosshead type!!)
Leather or rawhide edging
Linen thread
Linen to cover the front
Plywood (6-9mm)
Nails
Sandpaper
Shield boss
Sheet metal for washers
String
Wood glue
|
The
Boss
Best start with buying a shield boss.
These are widely available in all kinds of shapes and
sizes, but the main thing is that you remember to fit
your hand in one, with a glove if you use that. Although
you can drill holes for the rivets/coach bolts, most are
sold with holes, a four or five (star-pattern) will do
just fine. Remember to ask for bolts if you don't have a
supplier handy.
The
wood
Of course, to be authentic you'd need
three layers of about 3mm thick wood, glue them together
and then start sawing the shield. Plywood comes in 3mm so
you could use that. But this shield is meant to be a
first one, none too fancy and sturdy enough to survive a
season's fighting or more seasons showing off. Therefore,
you'd best buy a single sheet of plywood, which in itself
is pressed wood in three layers. This sheet should be 6
or 9mm thick, no more or else the whole thing will be too
heavy. If you carry it around for a whole day your arm
will start protesting about that folly. Any thinner will
get you a lighter shield, but much more vulnerable as
well.
The
shape
Now you've got a wooden board, next is how
to get a shape on it. If you did this before, you can
draw an outline for the next shield, which is why I save
the cut-out leftovers (below). But if this is your first
you need to to some arithmatic. For an oval, you can't
simply draw a circle so you need two nails, some string,
a pencil and a formula. Stick two nails in the shield,
take a string which is a little more than twice the
lenght between them and draw an oval with a pencil, by
putting the pencil on the inside of the string and then
move it about. Simple? Not! The formula is needed to
decide where to stick your nail and determine the lenght
of the string.
Most shields of our period measured between 1.07 and
1.18m in length and 0.92 and 0.97 in width. Mine is 1.18
x 0.97m. This is the formula: If H is half the height of
the shield, W is half the width and N is half the
distance between the two nails. N square = H square - W
square. Or, N is the root of (H square - W square).
See the image below:

So, to
determine the lenght of your string, you need to
determine the distance between the two nails. In my case,
the sum was: N square = 58 square - 48.5 square, or the
root of (3364-2352.25=1011.75) = 31.8cm. Easy, isn't it?
My nails needed to be that far from the middle to draw a
nice oval. That was the hard part, which is why I save
those cut-out remains!
Sawdust
The images below will give you an idea:

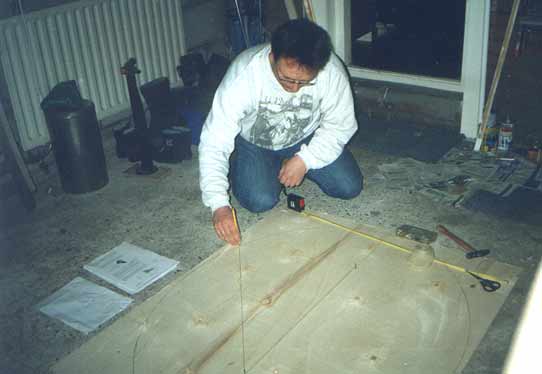
The Scutum is always a bother when first
drawn. Use two nails, a pencil and a string to
get the oval shape right. |

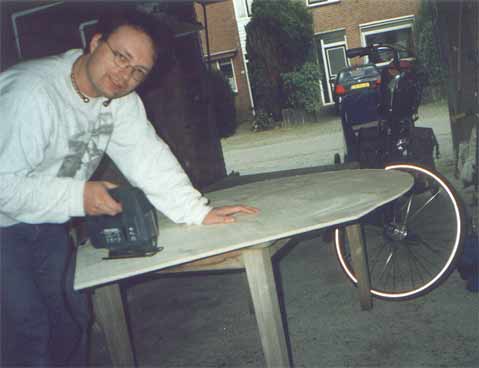
When the shape is drawn, use a sturdy table to
saw the shield (and best use protective goggles). |

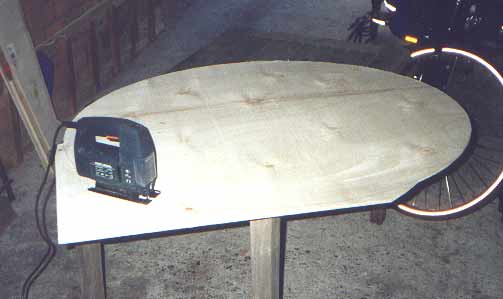
Nearly finished. Save the cut-away edges, so you
can copy the shape of this shield. |

The finished product, with cut-out grip. |
A
power jigsaw will get the job done in minutes. Save what
you sawed off for future use and sand down the edges for
safety and a smooth feeling.
Now,
place your boss on the middle and draw around it to
determine where your grip will come. Remember that the
cut-out must be smaller, so first measure the rim of the
boss. Either cut out a circle when you use a separate
handgrip, or a semi circle and a trapezoid like in my
example. I glued a wooden reinforcing cross-bar
horizontally on the back (below), which served as grip as
well. There is some discussion about that, but for later
period shields the horizontal option is the one most
represented in finds. A thin shield may best be
re-inforced vertically as well for strenght.
Now drill the holes for your boss and try it out. Best
mark which hole goes where, bosses usually aren't that
symmetrical. Do NOT add the boss right now, that's the last
thing to do when the shield is finished. You can start
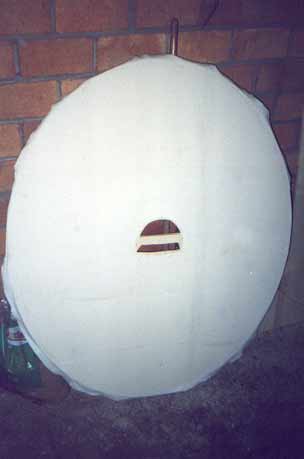
painting the back at this point.
Cover
Facing your shield will make it sturdier
and give it a longer life. You can use leather or cloth
to cover the front. Because leather damages easily (a
sword can take a chunck out of it) you'd best use thin
leather, canvas or linen, which is what I have used. Take
a sheet and stick it carefully across the front, right to
the edge or a little over it. Use watered-down wood glue
for an adhesive, that will do fine. Smooth it over so you
can see no wrinkles and take care to ensure that the
cover sticks down all over, or else you will get creases.

You can make several shields at once, of course.
However, not all phases of making a shield can be
done at the same time. Painting can, as well as
covering the front. |

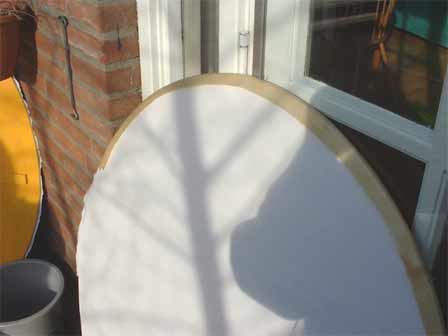
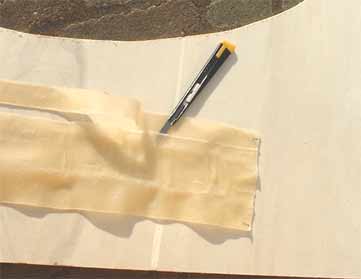
The front is covered with a sheet of linen, ready
for applying the edges. |

These shields are ready for applying the rawhide
rim. Both are painted on the back and have a
linen covering of the front. |

I usually don't cut the linen over the grip until
I've painted the front. |
 Edge Edge
Next is the edging. You can use rawhide,
leather or metal for this. The latter, however, is more
for earlier periods, and as leather is not as hard I've
used rawhide, which is also the most common material for
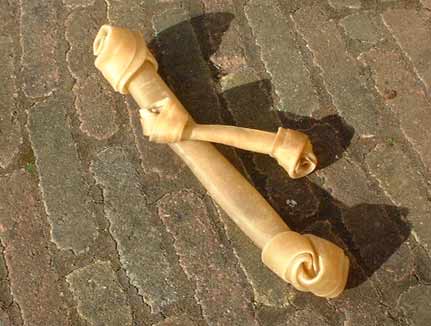
the period. Rawhide can be found in pet shops as dog
bones, which are really just folded strips of rawhide.
However, take care that you don't use rawhide which is
thicker than 1-1.5 mm, as that will take too long a time
soaking. Even then it will be next to impossible to sow
to the shield. Thin rawhide will work best.
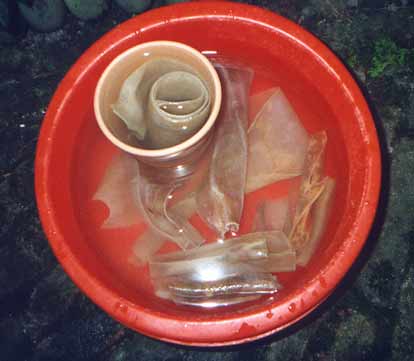
Just soak the bones for a good period (but not hours) and
when they start to smell, take them out and unfold.

Next stage, the rawhide edge. These are 'dog
bones' made of rawhide as you can buy them in pet
shops. |

Let the 'bones' soak a good while (ignore the
smell) before unrolling and cutting them up in
strips. |

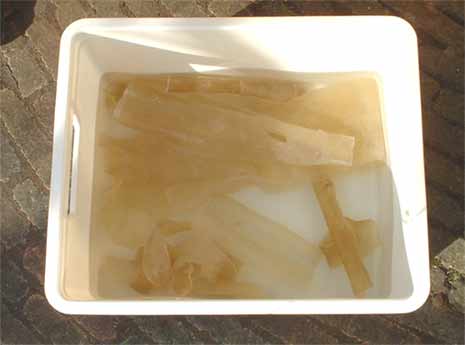
Unfold the bones when the've soaked for about an
hour, and remove the small bits you can't use. |

When soaked, nail the strips to a plank and cut
them into neat strips of about 5 cm. |
Before
you start cutting the strips, determine how wide your
edge is and how wide the strips must be. You need an
overlap of about 10-15mm on each side, so a strip of some
5cm will do fine. Also, determine how you will apply the
strips. If you drill the holes before applying the
rawhide, the material is still soft and easy to sew on.
The drawback, however, is that rawhide shrinks when
drying and it may cut your string when it does. You can
also drill the holes after the rawhide has dried, but the
stuff's tough and it may cost you a bit. Also, even after
a week's drying, the rawhide (when put in a hot place)
can shrink back 2-3 cm! I've experienced both methods,
and my solution is to let it dry for a few days in a cool
spot, then drill the holes.
The
images below will give you some idea how to apply the
rawhide strips to the edge:

First, measure the strips out on the edge, by
nailing them loosely. |

Then, stretch one end over one side of the shield
and nail down. |

Then, like a bicycle tyre, pull the rawhide back
over the edge, so that it stretches tight. |

The rawhide shrinks when it dries, so you might
want to drill the holes after it has dried. |
Do
not drill too close to the rim, as this might break when
the stitching pulls out, or when your shield receives a
good blow. Try and keep the holes evenly spaced, I know
it's hard because there may be hundreds to drill. But
remember, it was no machine-job in ancient times, and the
line is allowed to be a little uneven. Sow the rawhide on
with a linen thread, or another strong, period-like
fabric. This can be hard work and several needles may
break, so be sure to have a spare handy.
After
the edge is done and has dried, you may paint the front
of the shield. Best use several layers of paint to make
it a bit more sturdy, and to make sure that the first
blow will not show the wood. When it has dried, you can
bolt down the boss.
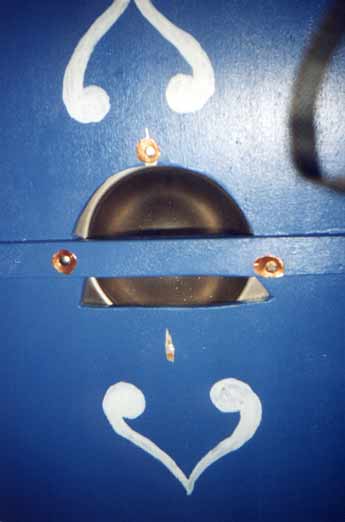
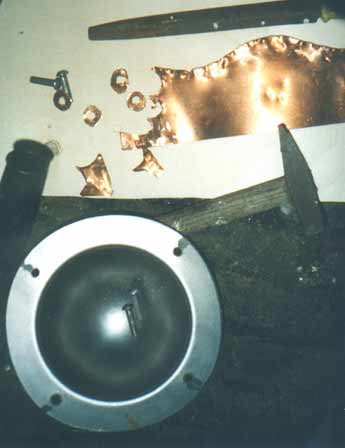
Bolts
& Washers
The final stage of making a shield. You
have already drilled holes for the boss and marked which
one goes where (a boss that doesn't fit would cause a bit
of problems in this stage). Cut down the rivets so that
they are as long as the boss, the board plus the washer,
plus about 2mm.
Cut away
the rest with a hacksaw. Cutting off too much will leave
you with a wasted rivet, too little and it won't rivet
right. For washers, you best make these yourself by
drilling through a sheet of metal (bronze or brass looks
good) and cut around it in a ring or a triangle. Now bolt
down the boss, apply the washer and hammer flat what is
still showing of the rivet down with a ball peen hammer.
The boss is now securely attached.
If you
need to finish off the painting, this is the time. You
may leave the rim bare, but I like to paint it, because I
feel the 4th century Roman loved as much color as he
could get. I painted it in the color of the front for
effect, but of course you could paint it every color,
even black would do fine. The boss, too, may be painted
over, as we can see in several examples from Late
Antiquity, although this time I chose to leave it as it
is.
The painted back, with glued-on cross-bar and
washers in place (finished stage). |

The shield is finished, and after painting the
front, the boss can be added. |

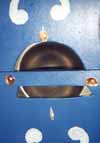
For the washers, use a sheet of metal, such as
bronze or brass. |

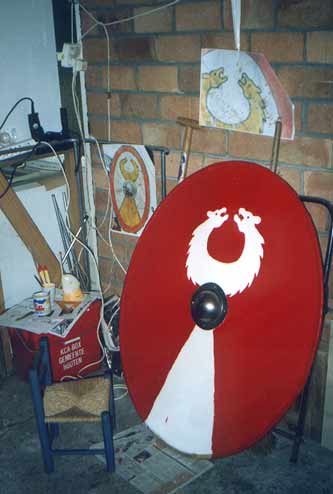
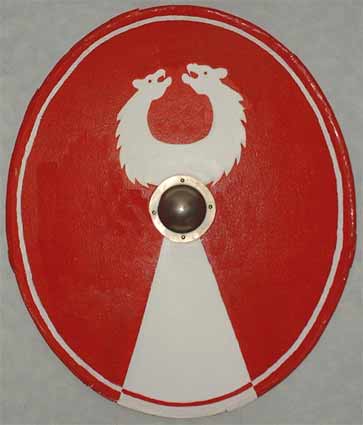
The finished product, showing the unit design of
the (imaginary) Fectienses seniores. |

The finished product, the back showing an
individual design based on a Dura Europos
shield. |
The
shield is now finished. Have fun with it.
Bibliography 
- Bishop, M.C. and
J.C.N. Coulston (1993): Roman Military Equipment,
from the Punic Wars to the Fall of Rome
(Batsford).
- Stephenson, I.P. (1999): Roman
Infantry Equipment, the Later Empire,
(Tempus).
- Madoc: Making an Auxilia
Shield, at: http://www.vicus.org.uk/documents/Auxiliashield.htm
|